Beginner Backpacking Food: 10 Simple Ingredients to Dehydrate at Home
If you’re interested in making your own backpacking meals, you don’t need an elaborate menu or advanced food-preservation skills to get started.
A dehydrator can turn ordinary ingredients into lightweight trail food that takes up less space in your pack. The easiest way to learn is to start with foods that are simple to prepare, easy to portion, and versatile enough to use in multiple recipes.
Instead of trying to make an elaborate freeze-dried dinner on your first attempt, begin with individual ingredients.
Here are 10 foods that make excellent starting points.
1. Zucchini
Zucchini contains a high percentage of water, which makes it a good candidate for dehydration.
Slice it into thin, consistent pieces before placing it on the trays.
Dried zucchini can be used in soups, pasta, couscous, and vegetable mixes.
Because zucchini has a mild flavor, it works with many different seasonings.
2. Sweet Potatoes
Sweet potatoes can become a versatile ingredient for trail meals.
Cook them first, then cut them into thin pieces or small cubes.
Once dehydrated, they can be combined with beans, rice, spices, or other vegetables.
They also work well in savory breakfast meals.
Their naturally sweet flavor can provide variety when most backpacking meals tend to be salty or savory.
3. Green Beans
Green beans can be prepared, cut into smaller pieces, and dehydrated for later use.
Their shape makes them easy to portion into meal bags.
Add them to soup, rice, pasta, or a vegetable stew.
Cutting the beans into smaller sections can make them easier to rehydrate and eat on the trail.
4. Cooked Beans
Beans can be useful for increasing the protein and carbohydrate content of homemade backpacking meals.
Cooked beans can be dehydrated and later incorporated into chili, rice bowls, burritos, and soups.
Because beans contain considerable moisture after cooking, spreading them out properly is important.
Flattening or breaking up larger pieces can also help them dry more consistently.
5. Pineapple
If you want a sweet trail snack, pineapple is an excellent option.
Fresh pineapple can be cut into small, relatively uniform pieces before dehydration.
The result is lightweight, sweet, and easy to carry.
Dried pineapple can be eaten by itself or added to oatmeal and trail mix.
It also provides a completely different flavor profile from typical savory backpacking food.
6. Strawberries
Strawberries are another beginner-friendly fruit.
Slice them relatively thinly and arrange the pieces in a single layer.
They can become chewy and concentrated in flavor after dehydration.
Dried strawberries make a convenient snack and can also be added to breakfast foods.
Because fruit can become sticky during drying, using appropriate tray liners can make cleanup easier.
7. Cooked Ground Meat
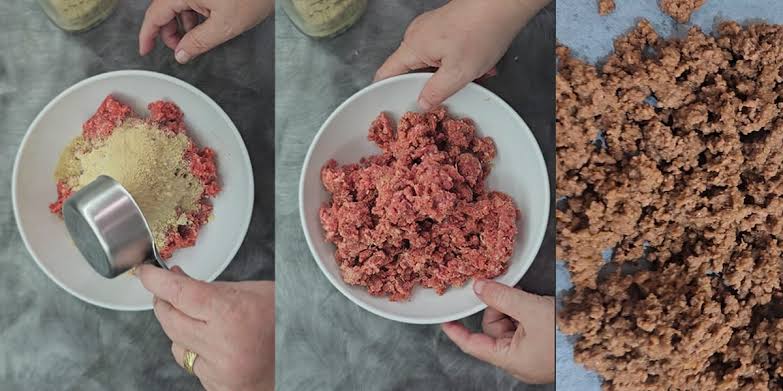
Meat requires more attention than fruits and vegetables, but cooked ground meat can be useful in homemade trail meals.
For food safety, use appropriate preparation, handling, and drying practices based on reliable food-preservation guidance.
Ground meat can be incorporated into chili, pasta, rice dishes, or other complete meals.
Once properly dried and packaged, it can reduce the weight of a meal considerably.
Beginners may want to master fruits and vegetables before moving into meat-based dehydration.
8. Onions
Onions are simple but extremely useful.
They add strong flavor without requiring much space.
Dice them into small pieces and spread them evenly on the tray.
Dehydrated onions can be added to almost any savory backpacking recipe.
Rice, soup, pasta, chili, beans, and couscous can all benefit from a small amount of dried onion.
Because the flavor becomes concentrated, a little can go a long way.
9. Spinach
Fresh spinach takes up a surprising amount of space, but dehydration dramatically reduces its volume.
Wash and dry the leaves thoroughly before dehydration.
You can leave small leaves whole or chop larger leaves into smaller pieces.
Dehydrated spinach can be added to soups, pasta, rice, eggs, or other trail meals.
It is an easy way to incorporate more vegetables into homemade backpacking food.
10. Applesauce
Applesauce demonstrates how versatile a dehydrator can be.
Instead of dehydrating only solid foods, you can spread applesauce thinly over an appropriate dehydrator sheet and dry it into a fruit-leather-style snack.
Once finished, it can be cut into strips and packed individually.
This provides an easy homemade alternative to some packaged fruit snacks.
Turn Ingredients Into Meal Kits
The real advantage of dehydrating individual ingredients is flexibility.
You don’t need to prepare an entirely different recipe for every hiking trip.
Instead, create a collection of dried ingredients.
For example, one meal bag could contain:
- Rice
- Sweet potato
- Green beans
- Onion
- Beans
- Seasoning
Another could contain:
- Pasta
- Mushrooms
- Spinach
- Tomato
- Sauce powder
By keeping ingredients available separately, you can create different combinations depending on your trip.
How to Make Dehydrating Easier
Preparation is often more important than the dehydrator itself.
Cut ingredients into consistent sizes.
Avoid putting wet and dry foods together on the same tray unless you’re familiar with how their drying times interact.
Leave space between pieces to allow airflow.
Don’t pile food into thick layers.
Check the food during the process rather than relying exclusively on a preset timer.
Different ingredients can have dramatically different drying times.
Don’t Skip Cooling and Packaging
After drying, allow the food to cool before packaging.
Warm food can create condensation inside a sealed package.
Once cooled, package the food appropriately for your intended storage period.
For backpacking trips, individual meal bags can make organization much easier.
Label each package with the contents and preparation date.
This is especially useful if you build a larger food stash for multiple trips.
Experiment With Texture
Not every dehydrated food needs to become completely crisp.
The ideal final texture depends on the food and how you intend to use it.
Fruit can remain chewy.
Vegetables are generally dried until sufficiently dry for the intended storage conditions.
Meal components should be dry enough to package safely and rehydrate effectively.
Experimenting with slice thickness can make a major difference.
Thin pieces usually dry faster, while thicker pieces may take longer and retain more chewiness.
Why Start With Simple Foods?
Beginner dehydrating is about learning how moisture, thickness, temperature, and airflow interact.
Simple foods give you a low-risk way to understand the process.
Once you can consistently dehydrate apples, onions, vegetables, rice, or pasta, you can move toward complete meals.
Eventually, you can create your own versions of curry, chili, pasta dishes, rice bowls, soups, and breakfast mixes.
You may also discover that homemade meals are cheaper and more customizable than relying entirely on commercial backpacking pouches.
Final Thoughts
You don’t need complicated recipes to start making your own trail food.
Zucchini, sweet potatoes, green beans, beans, pineapple, strawberries, ground meat, onions, spinach, and applesauce provide plenty of opportunities to practice.
Start with a small batch.
Learn how your particular dehydrator behaves.
Pay attention to food thickness, airflow, drying time, cooling, and packaging.
Then gradually combine your dried ingredients into complete meals.
The biggest advantage of DIY dehydrating isn’t simply saving pack weight. It’s the ability to build a trail-food system around the flavors, calories, ingredients, and portion sizes that work best for you.