DIY Dehydrated Beef for the Trail: A Safe Step-by-Step Method
Ground beef is one of those ingredients that can completely change homemade backpacking food.
Rice and vegetables are lightweight, but adding dehydrated beef turns them into a much more substantial meal. You can use it in chili, pasta, tacos, rice bowls, soups, or mashed potato dinners.
The challenge is that meat cannot be handled exactly like fruit or vegetables.
Ground beef is a high-protein, high-moisture food, and grinding distributes bacteria throughout the meat. For that reason, the process should begin with safe cooking rather than simply putting raw beef into a dehydrator.
The following method focuses on the practical details that matter most.
What You’ll Need
For a basic batch, you need:
- Lean ground beef
- A skillet or suitable cooking pan
- A food thermometer
- A food dehydrator
- Dehydrator trays
- Clean utensils
- Paper towels
- Food-storage bags or containers
- Labels
You can season the beef before drying if you intend to use it in a particular recipe.
However, keep the recipe simple if you’re experimenting for the first time.
Step 1: Start With Fresh, Properly Stored Beef
Purchase ground beef that has been kept properly refrigerated.
Keep it at 40°F or below and follow the recommended use or freezing period. USDA and the National Center for Home Food Preservation recommend using or freezing ground beef within two days when refrigerated appropriately.
If frozen, thaw it safely in the refrigerator.
Never rely on a countertop thawing method for meat.
The objective is to control the temperature from the moment you purchase the meat until you cook it.
Step 2: Choose a Lean Product
When dehydrating meat for backpacking, lean ground beef is generally preferable.
Why?
Because moisture can be removed through dehydration, but fat behaves differently.
Excess fat remains in the finished food and can eventually become rancid.
That means a very fatty ground beef may not be the best choice for a backpacking food stash.
Using lean meat and draining excess fat after cooking helps improve the finished product.
Step 3: Cook Before Dehydrating
This is the most important safety step.
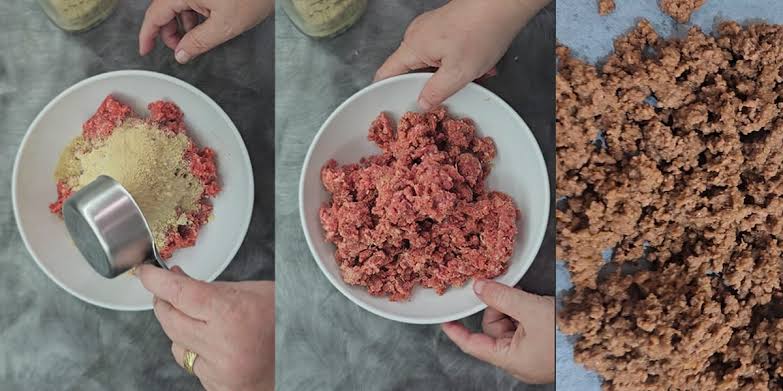
Brown the ground beef thoroughly in a skillet.
Break it into small crumbles while cooking.
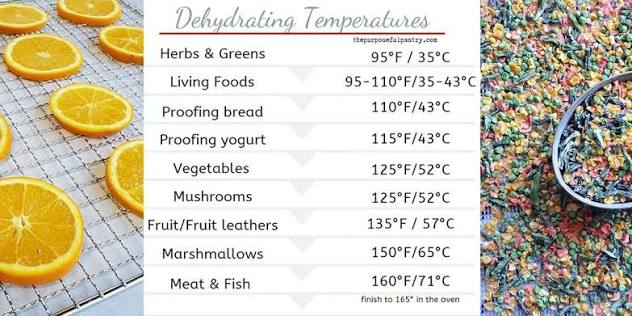
Use a food thermometer to verify that the meat reaches 160°F (71.1°C).
USDA specifically recommends heating meat to 160°F before the dehydration process for homemade jerky.
Why not simply let the dehydrator cook it?
Because dehydration usually involves relatively low temperatures. As moisture evaporates, much of the heat energy is used in that evaporation process. USDA explains that this can prevent the meat itself from reaching a temperature sufficient to destroy harmful bacteria early enough in the drying process.
Cooking first removes that uncertainty.
Step 4: Drain the Fat
Once the beef is fully cooked, drain away as much excess fat as possible.
You can also briefly blot the cooked meat with clean paper towels.
This isn’t about making the beef completely fat-free.
It is about reducing unnecessary surface fat that could affect storage quality.
For backpacking food that may sit in a pack for several days, minimizing excess fat is particularly useful.
Step 5: Break Up Large Pieces
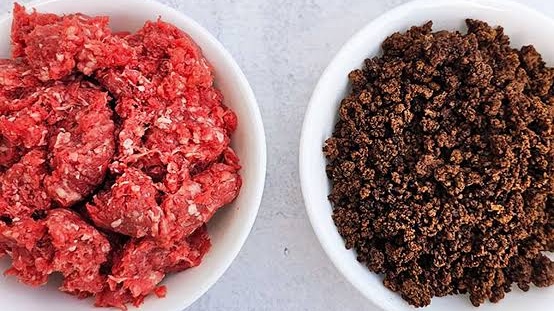
Look through the cooked beef and break up large clumps.
Uniform, small pieces are easier to dry.
They are also easier to rehydrate.
Imagine trying to rehydrate a large ball of dried ground beef in a small camping pot.
The outside could soften while the center remains hard.
Smaller pieces provide much more surface area for water to penetrate.
Step 6: Spread the Beef Across the Trays
Arrange the cooked beef in a thin layer.
Don’t create a thick mound.
Leave enough space for air to circulate around the pieces.
Overloading a tray can slow dehydration and create uneven results.
If you have a large batch, use multiple trays rather than forcing everything into one layer.
A dehydrator with good airflow can make batch processing considerably easier.
The National Center for Home Food Preservation notes that dehydrators work through a combination of heat and air circulation, and that airflow design can influence drying performance.
Step 7: Set the Dehydrator Correctly
For meat drying, follow both the dehydrator manufacturer’s instructions and current food-safety guidance.
USDA recommends maintaining approximately 130–140°F during the drying stage after the meat has received the necessary heat treatment.
Different dehydrators behave differently, so don’t assume the temperature shown on the control panel is identical to the temperature at every location inside the machine.
A food thermometer can help you understand how your machine performs.
Step 8: Check the Food During Drying
There isn’t one universal drying time.
Small crumbles may dry faster than larger pieces.
A crowded tray may take longer.
Humidity and airflow can also affect the process.
Rather than choosing an arbitrary number of hours and walking away, check the food periodically.
The National Center’s guidance for jerky recommends checking samples as drying progresses rather than relying exclusively on a fixed schedule.
The final product should be thoroughly dried for its intended use.
Step 9: Cool Before Packaging
Once the dehydration process is complete, remove the beef and allow it to cool completely.
This is an important storage step.
If warm food is sealed immediately, trapped heat can cause condensation.
That moisture can reduce quality and potentially encourage mold growth.
The National Center recommends cooling dried foods completely before packaging them.
Step 10: Package for Your Backpacking Trip
Once cooled, divide the beef into portions.
You can package it by itself or combine it with other dehydrated ingredients.
For example:
Backpacking chili: dehydrated beef + beans + tomatoes + corn + chili seasoning.
Beef pasta: dehydrated beef + pasta + sauce powder + vegetables.
Beef rice bowl: dehydrated beef + rice + peppers + onions + seasoning.
Trail shepherd’s pie: beef + dehydrated vegetables + mashed potato flakes + gravy mix.
Label each package with the meal name and date.
This turns your dehydrated ingredients into an organized trail-food system.
How Much Beef Should You Pack?
The answer depends on your overall meal plan and energy requirements.
Instead of copying someone else’s portion size, calculate the amount based on your own recipe.
You can weigh the cooked beef before dehydration and then weigh it again afterward.
The large reduction in weight comes primarily from water loss.
This makes it easier to develop consistent recipes.
For example, after several batches, you can determine how much dried beef corresponds to the amount you normally use in one dinner.
Rehydrating at Camp
At camp, combine the dried beef with the other ingredients and add hot water.
Let the food sit long enough to absorb moisture.
Some meals benefit from simmering, while others can be prepared by soaking and then heating.
Experiment at home before taking a new recipe on a long trip.
This allows you to determine how much water the meal needs and how long the beef takes to become tender.
Storage: Don’t Assume “Dry” Means “Forever”
Proper dehydration reduces moisture, but it does not mean homemade dried meat can be stored indefinitely at room temperature.
The National Center for Home Food Preservation states that properly dried jerky can be kept at room temperature for a limited period, but recommends refrigeration or freezing for better storage life and quality.
For a backpacking trip, prepare and store the food appropriately before departure.
Avoid keeping a large homemade meat stash for months under warm conditions without understanding the storage limitations.
Safety Checklist
Before putting dehydrated ground beef in your backpack, ask:
Was the raw meat kept refrigerated?
Was it cooked to 160°F?
Was excess fat removed?
Was the meat spread into a thin layer?
Was the dehydration process controlled?
Was the finished food cooled completely?
Was it packaged in clean, moisture-resistant packaging?
Was it stored appropriately before the trip?
If you cannot confidently answer these questions, reconsider using the batch.
Final Thoughts
DIY dehydrated ground beef is a practical way to add protein and flavor to homemade backpacking meals.
The process isn’t difficult, but it does require discipline.
The key is to treat food safety as a sequence rather than a single step: safe refrigeration, clean preparation, thorough cooking to 160°F, proper dehydration, complete cooling, and appropriate storage.
Once you have the process under control, ground beef becomes one of the most versatile ingredients in a homemade trail-food pantry.
A small package of dried beef can transform simple rice, pasta, beans, potatoes, or vegetables into a satisfying camp meal while keeping the food lightweight and easy to pack.