Build a 5-Day Dehydrated Backpacking Menu: A Complete Cost and Weight Breakdown
Planning five days of backpacking food is very different from planning dinner at home.
On the trail, every ounce matters, preparation time matters, and food needs to provide enough energy for long days of walking.
Dehydrating your own meals can solve several of these problems at once. Removing water makes many foods dramatically lighter, while homemade recipes let you control portions, ingredients, calories, and cost.
But how much work does it actually take to prepare five days of food?
Let’s break down a complete hypothetical menu from shopping to packing.
Step One: Build the Menu Before Buying Food
The first mistake many beginners make is shopping before planning.
Instead, start by creating a five-day menu.
For each day, list:
- Breakfast
- Morning snack
- Lunch
- Afternoon snack
- Dinner
- Dessert or evening snack
Then estimate the calories and weight of each item.
This prevents you from buying large amounts of ingredients that don’t fit your final menu.
The Five-Day Menu
Here’s one example.
Day 1
Breakfast: oatmeal, dried apples, peanut butter powder
Lunch: tortillas, beans, cheese, dried peppers
Dinner: beef and vegetable rice
Snacks: trail mix and energy bar
Day 2
Breakfast: oatmeal, dried banana, nuts
Lunch: couscous, dried vegetables, olive oil
Dinner: beef pasta with tomato sauce
Snacks: dried fruit and nuts
Day 3
Breakfast: oatmeal, raisins, powdered milk
Lunch: tortillas, beans, cheese
Dinner: dehydrated chili with beef, beans, corn, and tomatoes
Snacks: trail mix and chocolate
Day 4
Breakfast: oatmeal, dried strawberries, peanut butter powder
Lunch: couscous with vegetables and protein
Dinner: curry rice with dehydrated vegetables and protein
Snacks: energy bars and dried fruit
Day 5
Breakfast: oatmeal, banana, cinnamon
Lunch: tortillas with peanut butter and dried fruit
Dinner: pasta with beef and vegetables
Snacks: trail mix and chocolate
This menu uses many of the same ingredients in different combinations.
That is deliberate.
Buying a smaller number of versatile ingredients makes preparation easier and reduces food waste.
How Much Food Should You Buy?
The shopping list might include:
- 2 pounds of oats
- Rice
- Pasta
- Couscous
- Several pounds of fresh vegetables
- Fresh fruit
- Beans
- Lean ground beef
- Nuts
- Peanut butter powder
- Tortillas
- Cheese
- Powdered milk
- Sauce and seasoning
- Trail mix ingredients
The amount depends on your target calories and personal serving sizes.
Don’t blindly follow another hiker’s portion sizes.
A person hiking 15 miles with significant elevation gain may need a very different amount of food from someone hiking five easy miles.
The Preparation Stage
Start by preparing foods separately.
Cook rice and pasta.
Cook beans if you’re using homemade beans.
Cook ground beef thoroughly and drain excess fat.
Wash and cut vegetables.
Slice fruit.
Keep food safety in mind throughout the process, especially when handling meat.
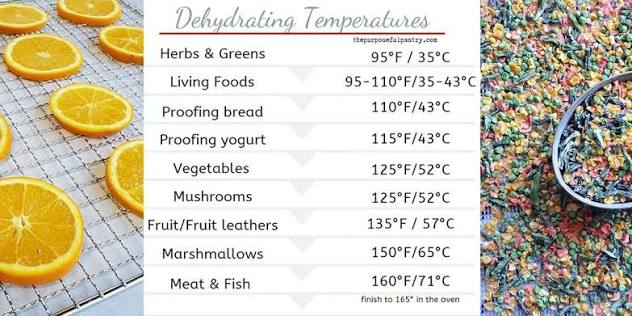
Once the ingredients are prepared, spread them on dehydrator trays according to their drying requirements.
Estimate the Drying Time
Different ingredients require different amounts of time.
For example, sliced vegetables might require several hours.
Cooked grains and pasta may take longer.
Fruit can vary substantially depending on moisture content and thickness.
Ground beef also requires its own preparation and drying process.
Instead of trying to estimate the entire project as one drying cycle, think in terms of batches.
You might run the dehydrator for 8–12 hours on several occasions.
The total elapsed time could therefore be a couple of days, even though your active kitchen work is much shorter.
Active Time vs. Machine Time
This distinction is extremely important.
Suppose your dehydrator runs for 10 hours.
You don’t necessarily spend 10 hours standing next to it.
You may spend:
30 minutes preparing vegetables.
45 minutes cooking rice and pasta.
45 minutes preparing meat.
30 minutes loading trays.
15 minutes checking progress.
45 minutes packaging.
The actual hands-on work might be around three to four hours.
This makes homemade dehydrating much more practical.
Calculating the Food Cost
Let’s create a hypothetical five-day grocery allocation:
| Category | Estimated Cost Used |
|---|---|
| Breakfast ingredients | $10 |
| Rice, pasta, couscous | $8 |
| Vegetables | $12 |
| Fruit | $8 |
| Beans | $6 |
| Meat/protein | $15 |
| Snacks | $20 |
| Seasonings and sauces | $5 |
| Total | $84 |
The actual numbers will vary by store, brand, package size, and region.
If only $70 worth of the purchased ingredients is actually consumed by the trip, your effective food cost is $70 rather than the full checkout total.
This distinction becomes important when comparing DIY meals with commercial backpacking food.
Add Electricity
A dehydrator can run for many hours.
Electricity cost depends on the machine’s power consumption, how long it operates, and your local electricity rate.
For a typical home batch, the electricity cost may be relatively modest compared with the ingredient cost.
Suppose your total electricity cost for the project is $4.
Your running cost becomes:
$70 food + $4 electricity = $74
Add approximately $6 for packaging, and the total becomes:
$80
That’s approximately $16 per day for five days.
What About the Dehydrator?
If you already own the machine, you may not need to charge the entire purchase price to one trip.
A better approach is to spread the equipment cost across many meals.
Suppose your dehydrator cost $120 and you expect to prepare 240 meals with it.
That equals:
$120 ÷ 240 = $0.50 per meal
If your five-day menu contains 15 prepared meals, the equipment allocation would be approximately $7.50.
That makes your broader DIY cost around $87.50.
Again, this is an accounting method rather than an immediate cash expense.
Weight Breakdown
Now consider the biggest advantage of dehydration: water removal.
Fresh vegetables can be surprisingly heavy.
Fresh fruit is also mostly water.
Cooked rice and pasta carry considerable moisture.
After dehydration, these ingredients become much lighter and more compact.
A hypothetical five-day menu might look like this:
Breakfasts: 1.0–1.3 lb
Lunches: 1.5–2.0 lb
Dinners: 2.0–2.5 lb
Snacks: 2.0–2.5 lb
Total: approximately 6.5–8.3 lb
That gives a food load of roughly 1.3–1.7 pounds per day.
Your actual result could be outside this range depending on calorie targets and food choices.
Calories Per Ounce Matter
Weight alone isn’t enough.
Imagine two five-day menus that both weigh seven pounds.
One provides 12,000 calories.
The other provides 15,000 calories.
The second menu delivers more energy for the same carried weight.
This is why backpackers should consider calorie density.
Nuts, oils, nut butter powder, chocolate, and other calorie-dense foods can increase the energy delivered per ounce.
Dehydrating removes water, but it doesn’t automatically make a low-calorie food calorie-dense.
A bag of dried vegetables may be extremely light but provide relatively few calories.
Packaging and Organization
Once everything is completely dry and cooled, divide the food into daily or meal-sized portions.
A simple system is:
Day 1 Breakfast
Day 1 Lunch
Day 1 Dinner
Day 2 Breakfast
And so on.
This makes camp organization easier.
You can also place each day’s food into one larger bag.
Write preparation instructions directly on the package.
For example:
Add 1¼ cups boiling water.
Stir.
Wait 10 minutes.
Add more water if necessary.
This eliminates guesswork when you’re tired at camp.
The Real Benefit of a Five-Day Prep Session
The biggest advantage of preparing five days at once is efficiency.
Once the dehydrator is running, you’re processing food for multiple meals.
The same vegetables can appear in several recipes.
The same rice can become curry one night and beef rice another night.
This reduces the amount of separate preparation required.
It also creates a repeatable system.
After completing one five-day menu, you know approximately how much food you need, how long your ingredients take to dry, and how much the finished meals weigh.
The next trip becomes easier.
Final Thoughts
A complete five-day dehydrated menu requires planning, but it doesn’t have to become a major project.
A reasonable workflow is:
Plan → shop → cook → dehydrate → cool → weigh → package → label.
A hypothetical five-day menu might cost around $70–$90 in consumed food, packaging, electricity, and equipment allocation, while weighing roughly 6.5–8.3 pounds depending on calories and ingredients.
The exact numbers are less important than measuring your own results.
After several trips, track three things:
Cost per day
Calories per day
Food weight per day
Once you have those numbers, you can gradually optimize your menu—cutting unnecessary weight, increasing calorie density, reducing food costs, and choosing meals that you genuinely enjoy eating after a long day on the trail.