How to Keep Your Backpacking Food Dry During Rainy Multi-Day Hikes
Rain can turn a beautiful backpacking trip into a frustrating experience when it reaches your food supply. A little moisture inside your backpack might not seem like a serious problem at first, but after several days of hiking, damp food packaging, soggy snacks, leaking meal bags, and wet ingredients can become major inconveniences.
Imagine opening your food bag after a long, rainy hiking day only to discover that your oatmeal packets are damp, your trail snacks are soaked, and your dinner ingredients have been exposed to water.
Keeping backpacking food dry isn’t just about protecting the taste and texture of your meals. It’s also about preventing contamination, maintaining food quality, reducing waste, and ensuring that your planned calories remain available throughout the trip.
Fortunately, you don’t need an expensive waterproof backpack to protect your meals.
With the right combination of pack liners, dry bags, individual food packaging, and smart moisture management, you can keep your food organized and protected during multi-day hikes.
Here’s how to build a reliable food-protection system for wet-weather backpacking. 🌧️
1. Understand Where Moisture Comes From
Rain is the obvious source of moisture, but it isn’t the only one.
Backpacking food can become wet through several different routes.
- Rain penetration: Water enters through backpack openings, zippers, seams, or damaged fabric.
- Wet gear: Rain jackets, tents, and other damp equipment can transfer moisture to food.
- Condensation: Temperature changes can create moisture inside poorly managed packaging.
- Leaking containers: Water bottles, hydration reservoirs, and cooking equipment can leak.
- Wet hands: Handling food packaging with wet hands can introduce moisture.
- Ground contact: Food placed directly on wet ground can absorb moisture through packaging that isn’t adequately sealed.
Understanding these sources helps you choose the right protection instead of relying on one waterproof product.
The goal is to create multiple layers of protection between your food and the surrounding moisture.
2. Backpack Waterproof Liners: Your First Line of Defense
Best for: Protecting the main food supply inside your backpack.
A waterproof backpack liner is one of the simplest ways to protect food during rainy hikes.
It sits inside your backpack and creates a waterproof barrier around the contents.
Unlike a rain cover, which protects the outside of the pack, an internal liner helps prevent water from reaching your belongings through openings, seams, or other vulnerable areas.
Advantages:
- Protects multiple food packages at once.
- Usually lightweight and simple to use.
- Helps keep food separate from wet backpack fabric.
- Can protect other important items when packed correctly.
Disadvantages:
- A puncture or tear can compromise protection.
- Opening the liner in the rain can expose its contents.
- Poor closure can allow water inside.
- Food may still get wet if placed inside with damp packaging.
How to use a pack liner correctly
- Open the liner inside your backpack.
- Check for holes, tears, or damaged seams.
- Place your food supply inside, keeping it separate from potentially leaking items.
- Push excess air out without crushing fragile food.
- Fold or roll the opening according to the manufacturer’s instructions.
- Keep the closure above the contents and avoid placing heavy objects where they could damage the liner.
A properly closed liner provides excellent general protection, but it should not be treated as indestructible.
For longer trips in consistently wet weather, consider adding another layer of protection for especially important food supplies.
3. Waterproof Dry Bags: Extra Protection for Valuable Food
Best for: Separating important meals and protecting food that must stay completely dry.
Dry bags provide another layer of protection. They’re particularly useful when you want to separate breakfast, lunch, dinner, and snacks instead of storing everything together.
Unlike a single large pack liner, several smaller dry bags allow you to organize food by category or day.
Advantages:
- Help protect food from rain and accidental spills.
- Allow you to organize meals into separate groups.
- Reduce exposure when accessing individual food portions.
- Reusable models can be used across multiple trips.
Disadvantages:
- Add some weight and packing bulk.
- Can be more expensive than simple plastic food bags.
- Poorly rolled closures can allow water inside.
- Not every product is designed for prolonged submersion.
How to choose a backpacking dry bag
Consider these features:
- Material: Look for durable waterproof materials such as coated nylon or TPU-coated fabrics.
- Closure: Roll-top closures are common and effective when properly secured.
- Size: Choose a size that accommodates your food without excessive empty space.
- Weight: Ultralight options are useful when every ounce matters.
- Durability: Check the material, seams, and closure construction.
One important distinction: a water-resistant bag is not necessarily waterproof. Check the manufacturer’s stated protection level rather than assuming every dry bag can withstand immersion.
For most backpacking trips, a small dry bag for essential meals combined with a larger pack liner can provide practical protection without carrying too many separate containers.
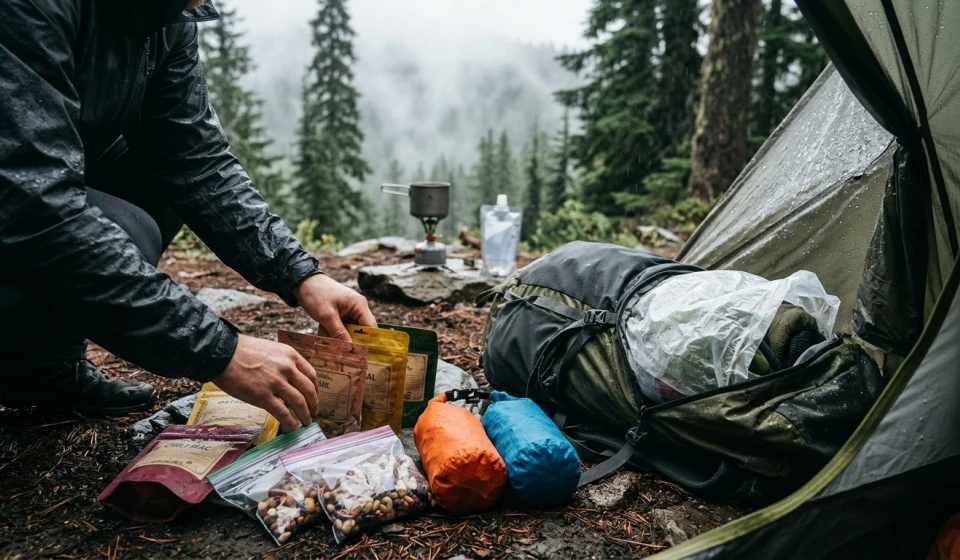
4. Individual Food Packaging: Protect Every Meal Separately
Best for: Preventing leaks, organizing daily meals, and protecting ingredients.
Even if you use a waterproof backpack liner or dry bag, individual food packaging remains important.
Why? Because one damaged package can affect other ingredients if everything is stored together.
For example, a small leak from a sauce packet can spread through your food supply. A punctured oatmeal bag can allow moisture to reach the contents.
Individual packaging helps contain these problems.
Useful packaging options
| Packaging type | Best use | Main consideration |
|---|---|---|
| Food-grade resealable bags | Oatmeal, snacks, dried meals | Check seals regularly |
| Heat-sealed food pouches | Dehydrated meals | Protect against punctures |
| Rigid food containers | Fragile ingredients | Heavier and bulkier |
| Original sealed packaging | Commercial trail meals | Inspect for damage |
| Small reusable containers | Seasonings and toppings | Ensure secure closures |
Practical packaging tips
- Divide bulk ingredients into individual meal portions.
- Remove excess air where appropriate.
- Label packages with meal names and preparation instructions.
- Double-bag ingredients that could create a mess if they leak.
- Keep powdered ingredients away from liquids.
- Avoid packaging sharp items with delicate food bags.
For example, instead of carrying one large bag of oatmeal, prepare individual breakfast portions containing oats, powdered milk, chia seeds, and dried fruit.
This makes breakfast easier to prepare and reduces repeated exposure to moisture.
Important: Use food-safe packaging intended for food contact. Don’t assume ordinary household plastic bags or repurposed chemical containers are suitable for storing food.
5. Waterproof Liners vs. Dry Bags vs. Individual Packaging
Which option should you choose?
Each system solves a slightly different problem.
| Feature | Pack liner | Dry bag | Individual packaging |
|---|---|---|---|
| Main purpose | Protects bulk contents | Protects selected groups | Protects individual meals |
| Organization | Limited | Good | Excellent |
| Weight | Usually low | Varies by size | Usually very low |
| Reusability | Usually reusable | Reusable | Depends on material |
| Leak containment | Depends on construction | Good when properly sealed | Depends on package |
| Best application | Main backpack protection | Important food supplies | Daily meal portions |
The most practical solution: Combine all three
You don’t necessarily need to choose only one.
For rainy multi-day hikes, a layered approach is often more reliable:
- Put individual meals in sealed, food-safe packaging.
- Group important meals inside a waterproof dry bag.
- Place the food bags inside your main backpack liner.
This creates multiple barriers against water.
However, remember that multiple layers are not a guarantee against damage. Inspect packaging and closures regularly.
6. Manage Moisture Before It Reaches Your Food
Waterproof equipment is useful, but good packing habits are equally important.
Here are practical ways to reduce moisture exposure.
Keep wet equipment separate.
Don’t place wet rain jackets, muddy gloves, or damp tent components inside the same compartment as your food.
Use an external pocket or separate waterproof storage area when possible.
Dry your hands before handling meals.
Before opening food packages, wipe your hands with a clean towel or use another hygienic method.
This is particularly important when preparing meals that will be eaten directly from their packaging.
Avoid opening food bags in heavy rain.
If possible, prepare meals inside a sheltered tent vestibule or another protected location.
Be careful with cooking equipment and open flames around tents, especially when ventilation is limited.
Inspect your backpack regularly.
Check for:
- Damaged seams.
- Worn-out waterproof coatings.
- Torn pack liners.
- Loose roll-top closures.
- Wet spots around hydration reservoirs.
Small problems are easier to fix before they affect your entire food supply.
7. Prevent Food Contamination During Rainy Hikes
Keeping food dry is important, but protecting it from contamination is just as essential.
Rainy conditions can make food preparation more challenging because surfaces, hands, utensils, and storage areas may become wet or dirty.
Follow these precautions:
- Keep food off the ground.
- Use clean hands and utensils when preparing meals.
- Keep raw ingredients separate from ready-to-eat foods.
- Don’t use packaging that has been contaminated by dirty water.
- Discard food if its safety is uncertain.
- Keep food protected from animals and insects.
What about food that gets wet?
The answer depends on what happened.
If the outside of a sealed, intact food package becomes wet with clean rainwater, dry the exterior before opening it.
If water enters an opened package, inspect the food carefully. If the water may be contaminated, or if the food has been exposed to dirt, animal waste, or other contaminants, discard it.
Don’t assume that cooking will make every contaminated food safe.
Also remember that waterproof packaging does not replace temperature control. Cooked meat, dairy products, and other perishable foods require appropriate refrigeration or validated temperature-controlled storage. For typical multi-day backpacking trips without reliable cold storage, shelf-stable foods are generally the safer choice.
8. Organize Food by Day to Reduce Repeated Exposure
A simple daily food organization system can make rainy hiking much easier.
Instead of opening one large food container several times a day, separate your meals into daily portions.
For example:
| Day | Breakfast | Lunch | Dinner |
|---|---|---|---|
| Day 1 | Oatmeal | Tortilla wrap | Dehydrated chili |
| Day 2 | Chia oatmeal | Trail snacks and wrap | Instant rice with beans |
| Day 3 | Granola | Peanut butter sandwich | Lentil meal |
| Day 4 | Oatmeal | Crackers and tuna pouch | Pasta meal |
| Day 5 | Granola | Trail snacks and wrap | Instant potatoes with protein |
This is an example menu, not a guarantee of nutritional adequacy. Adjust portions and calories to your individual hiking needs.
Keep each day’s food together in a labeled package or small dry bag.
This offers several advantages:
- Less time searching for ingredients.
- Fewer opportunities for moisture exposure.
- Easier food inventory management.
- Better portion control.
- Simpler campsite meal preparation.
For longer hikes, keep backup food separately protected in case a daily package becomes damaged.
9. Common Mistakes to Avoid
Even experienced backpackers can make simple food-storage mistakes during wet-weather trips.
Mistake 1: Relying only on a backpack rain cover.
Rain covers can reduce water exposure, but wind-driven rain, openings, and water running down the back panel can still allow moisture inside. Use an internal liner as an additional barrier.
Mistake 2: Packing food with wet equipment.
A waterproof food bag won’t help much if you repeatedly open it with wet hands or place damp items inside.
Mistake 3: Overpacking unnecessary containers.
Carrying a separate dry bag for every meal can add unnecessary weight. Use a combination of individual packaging and one or two appropriately sized dry bags.
Mistake 4: Ignoring small package damage.
A tiny puncture can become a bigger problem after several rainy days. Inspect packaging before leaving and during daily food checks.
Mistake 5: Forgetting odor and wildlife protection.
Waterproof food storage is not automatically animal-proof storage. Follow local food-storage regulations and wildlife precautions. In bear country, use an approved bear-resistant canister or other required storage method. Never assume a dry bag provides protection against bears or other wildlife.
Final Thoughts 🌧️
Keeping backpacking food dry during rainy multi-day hikes requires more than buying one waterproof accessory.
A reliable system combines waterproof backpack liners, properly closed dry bags, individual food packaging, and smart moisture-management habits.
For most backpackers, the simplest approach is to protect individual meals first, group important supplies inside a dry bag, and use a main pack liner as the final barrier.
You don’t need the most expensive equipment to accomplish this. You need packaging that suits your food, closures that are used correctly, and a consistent routine for keeping wet gear away from your meals.
Remember, dry food means more than better-tasting meals. It means protecting your planned nutrition, reducing food waste, and making rainy days on the trail easier to manage.
Prepare your food system before the weather turns bad, and you’ll have one less problem to worry about when the next rainy hiking day arrives. 🥾