Cold Soaking for Dry Campsites: A Practical Guide
On bone-dry campsites where every drop of water is rationed and fuel canisters threaten to run out before the next resupply, the usual ritual of boiling dinner becomes a liability. Cold soaking—rehydrating food in a sealed container without heat—transforms these arid constraints into a liberating strategy. For desert trekkers and high-altitude hikers, this method slashes water waste, eliminates fire risk, and frees up pack weight for what really matters: more miles.
Why Dry Campsites Demand a Different Cooking Strategy
Dry campsites—whether the sun-scorched sandstone of the Grand Canyon or the wind-scoured granite of the Sierra Nevada—share a ruthless equation: every ounce of water must be carried or cached, and every calorie of fuel adds weight without adding hydration. Traditional cooking compounds these challenges in three critical ways.
First, boiling wastes water through evaporation. In a dry atmosphere, a pot of water loses 10–15% of its volume before it even reaches a simmer. Second, cleaning greasy cookware after a hot meal requires additional water—often 200–300 ml per meal—that you cannot afford in a waterless zone. Third, altitude mocks fuel efficiency. Above 10,000 feet, water boils at a lower temperature but takes longer to cook food, burning through your canister faster than any guidebook predicts.
Cold soaking sidesteps all three. By using ambient-temperature water (or even the tepid contents of your hydration bladder), you eliminate evaporation loss entirely. The same container that holds your rehydrating dinner doubles as your “bowl,” and a quick shake with a few drops of water suffices to rinse it out. No fuel, no stove, no fire—just patience and a well-chosen meal.
“On a 10-day JMT section through the Evolution Basin, where campsites were dry and winds shredded any stove flame, cold soaking let me skip dinner meltdowns. I’d start soaking at 3 p.m., eat at 6, and rinse with 50 ml. My fuel canister lasted the whole trip—for coffee only.” — Alex H., PCT thru-hiker
The trade-off? Texture and temperature. But in a dry landscape, where hydration is the real luxury, a cool bowl of rehydrated chili mac tastes far better than a half-burnt, waterless catastrophe.
Water Carry and Soak Timing: A Practical Framework
Planning water for cold soaking is simpler than for cooking because you don’t need extra for cleanup or evaporation. The formula: 1 cup (240 ml) of water per meal is typical for most grains and legumes, though some items like ramen or instant mashed potatoes may need 300 ml. Multiply by number of meals and add your drinking water—that’s your carry.
Timing, however, is the secret weapon. In dry, hot conditions (think Utah desert in May or the Eastern Sierra in August), you can cold soak in half the time recommended on the package. Warm water (80–90°F / 27–32°C) speeds hydration dramatically. Here’s a quick reference:
| Food | Water Volume | Soak Time (hot climate) | Soak Time (cool climate) |
|---|---|---|---|
| Instant couscous | 240 ml | 10–15 min | 20–30 min |
| Instant mashed potatoes | 300 ml | 5–10 min | 15–20 min |
| Ramen noodles (broken) | 300 ml | 15–20 min | 25–35 min |
| Oats (rolled) | 200 ml | 4–6 hours (overnight) | 6–8 hours |
| Lentils (pre-cooked, dehydrated) | 250 ml | 8–12 hours | 12–16 hours |
Strategy for long dry stretches: Start soaking your dinner at your last water source before entering a dry zone. For example, if you leave a reliable creek at 10 a.m. and plan to camp 15 miles away, pack out the water for dinner and for soaking. At camp, you simply pour that water into your soaking container, seal it, and let it sit while you set up your tent. By the time you’re ready to eat, the food is fully hydrated—no waiting, no wasted fuel.
For breakfast, soak oats or chia pudding the night before. In the morning, eat directly from the container, add a little extra water to rinse, and drink the rinse water. This “zero-waste” loop is especially valuable in the desert, where gray water disposal is prohibited and every drop counts.
Water Rationing Tip
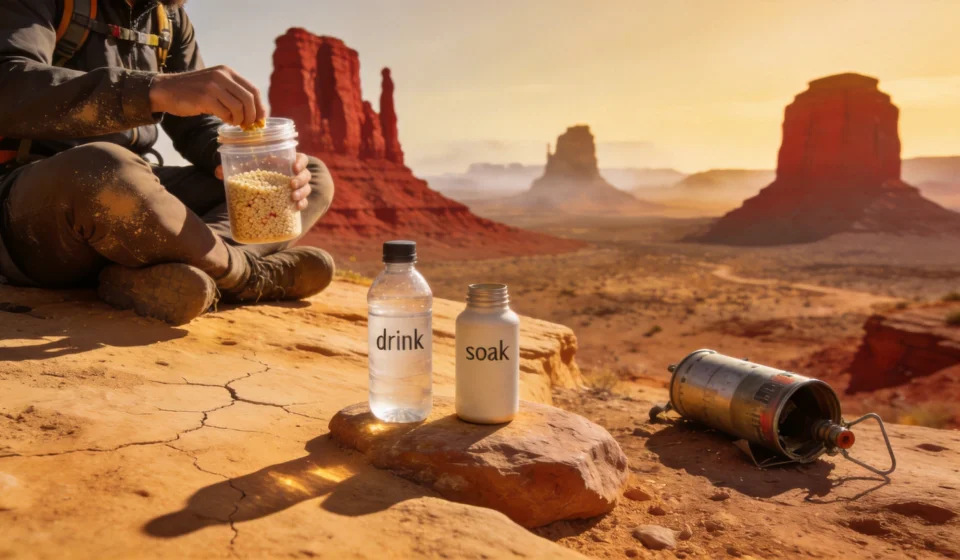
If you expect a dry water source at your campsite, carry an extra 500 ml per person per day for soaking and drinking combined. Mark your water bottles with a permanent marker: “drink” and “soak.” This prevents accidental overuse of your cooking water.
Gear Recommendations for Arid Trails
The right gear makes cold soaking effortless. Focus on three attributes: seal integrity, thermal mass, and weight.
- Wide-mouth plastic jar (e.g., peanut butter jar, Nalgene) — The classic choice. Light, nearly indestructible, and the wide mouth makes adding water and eating easy. Pro tip: use a 1-liter jar for dinner and breakfast (just rinse between meals). Avoid glass: it’s heavy and shatters on scree.
- Freezer-grade ziplock bags (quart or gallon) — Ultralight and pack flat. Double-bag to prevent leaks. Press out air before sealing to maximize submersion. Great for recipes that need a “cozy” (you can tuck the bag inside a hat or buff for insulation in cold deserts).
- Insulated food cozy (or DIY with reflectix) — While not essential in hot weather, a cozy can speed up rehydration by trapping heat from the water. In the desert, where daytime temps exceed 100°F, it’s often unnecessary. But at high altitude where nights are cold, a cozy helps maintain consistency.
- Silicone spoon or spork — A long-handled spoon reaches the bottom of a jar without getting your fingers in the food. Avoid metal utensils that scratch plastic or create sharp edges.
For water storage in dry camps, bring collapsible bottles (e.g., Platypus, Evernew) as backup for soaking water. They weigh next to nothing and can hold the extra 300 ml you’ll need for dinner. Bonus: they double as a shower bag in an emergency.
Gear to Avoid
- Ventilated containers (e.g., mesh bags) — they leak water and invite grit.
- Aluminum bottles — they conduct heat away from the soak, slowing rehydration.
- Flask-shaped containers — narrow necks make cleaning and eating a nightmare.
Recipes That Thrive in Dust and Heat
Dry campsites demand recipes that are shelf-stable, fast to rehydrate, and high in calories. Avoid anything that requires boiling water (like ramen with oil packets) unless you’re willing to soak it twice as long. Here are three field-tested combos:
Sun-Baked Couscous Salad
Combine ½ cup instant couscous, 1 tablespoon olive oil (in a tiny leak-proof bottle), 1 tablespoon dried vegetables (carrots, bell peppers), 1 teaspoon vegetable bullion powder, and a pinch of salt. At camp, add 240 ml water, shake, and let sit 15 minutes. Stir in the oil and eat. Calories: ~400. Water used: 240 ml + 30 ml rinse.
Desert Overnight Oats
Mix ½ cup rolled oats, 2 tablespoons powdered milk, 1 tablespoon brown sugar, and a handful of dried fruit (cranberries or apricots). Add 200 ml water, stir, and seal. Leave in your pack for 6–8 hours (or bury the jar in the sand to keep it cool). In the morning, top with a drizzle of the water from your bottle. Calories: ~500. Water used: 200 ml + 30 ml rinse.
Spicy Black Bean & Corn Mash
Pre-dehydrate a can of black beans (or use freeze-dried ones) and mix with instant corn masa flour, cumin, chili powder, and a pinch of dehydrated lime juice. Add 250 ml water, soak 4 hours. The result is a refried-bean-style paste that pairs well with tortillas (carried separately). Calories: ~600. Water used: 250 ml + 50 ml for rinsing tortilla crumbs.
- Pro tip for dry stretches
- Add a pinch of salt and a drop of electrolyte powder to your soaking water. Not only does it improve flavor, but it also helps retain moisture in the food—and replaces minerals lost through sweat.
- Another hack
- Carry a few pouches of olive oil or coconut oil (pre-portioned in straws sealed with heat). Swirl into cold-soaked meals for 100+ calories per tablespoon.
Practical Case Study: The Tonto Trail, Grand Canyon
On the Tonto Trail (a 90-mile dry route between the South Rim and Phantom Ranch), every campsite is bone-dry except for occasional tank water. A friend and I opted for cold soaking. Our meal plan: couscous with dehydrated vegetables for dinner, overnight oats for breakfast, and peanut butter tortillas for lunch.
We carried 6 liters of water per person per day (recommended minimum 4, but we added 1 liter for soaking). Each evening, we poured 300 ml from our “soak bottle” into a Talenti jar, added dinner mix, and buried the jar in the sand to keep it from overheating. By the time the sun set, the food was perfectly hydrated—no fuel, no cleanup. Breakfast was even easier: we ate the pre-soaked oats directly from the jar, then added a splash of water to swish and drank it.
Result: we consumed an average of 5.5 liters per person per day (including drinking), saved 0.75 liters per meal compared to boiling and cleaning, and carried no stove or canister. The weight savings allowed us to carry more water during the longest dry stretch (17 miles between Hance and Cottonwood).
“After three days of cold soaking in the desert, I never once missed hot food. The convenience of not hauling a stove—and not worrying about running out of water to clean my pot—was liberating. I’m a convert.” — Sarah K., Grand Canyon ranger and avid backpacker
Conclusion
Cold soaking isn’t just a compromise for dry campsites—it’s an optimization. By eliminating fuel, reducing water demand, and simplifying cleanup, it turns the harsh constraints of arid trails into a lightweight, efficient system. Whether you’re crossing the Escalante desert or traversing the High Sierra’s rain shadow, trust the soak. Your pack will be lighter, your water will last longer, and you’ll spend more time enjoying the silence of the dry places.